As a startup, we are looking for investor and cofounder. Please contact us at https://freenergi.com/page/kontak
Website https://www.freenergi.com – Solar power plant installation and solar power product manufacturer.
As a startup, we are looking for investor and cofounder. Please contact us at https://freenergi.com/page/kontak
Website https://www.freenergi.com – Solar power plant installation and solar power product manufacturer.
Freenergi didirikan untuk memberikan solusi permasalahan Anda !
Freenergi merupakan startup yang bergerak di bidang manufaktur produk pembangkit tenaga listrik dan layanan jasa instalasi pasang panel surya plts atap serta instalasi kelistrikan.
Freenergi menyediakan pengurusan SLO & perizinan PLN untuk instalasi panel surya on grid.
Freenergi berfokus pada kepuasan setiap customer karena kami percaya setiap bisnis akan besar dengan memberikan pelayanan dan produk terbaik bagi setiap customer. Kami bertujuan untuk memenuhi kebutuhan Anda dan memberikan solusi permasalahan Anda.


It’s 2020 now, I’ve founded a startup called Freenergi .
Freenergi is a renewable energy startup company based in Indonesia. We provide solar power installation, provide solar as service, manufacture solar power products to reduce residential customers electricity bill and providing clean energy solutions for indoor and outdoor.
Freenergi products :
Services
Website https://www.freenergi.com
In case you are indonesian :
Freenergi merupakan startup yang bergerak di bidang manufaktur produk pembangkit tenaga listrik dan layanan jasa instalasi panel surya serta instalasi kelistrikan.
Freenergi menyediakan pengurusan SLO & perizinan PLN untuk instalasi panel surya on grid.
Freenergi berfokus pada kepuasan setiap customer karena kami percaya setiap bisnis akan besar dengan memberikan pelayanan dan produk terbaik bagi setiap customer. Kami bertujuan untuk memenuhi kebutuhan Anda dan memberikan solusi permasalahan Anda.
Produk Freenergi
Layanan Freenergi
tags: panel surya, jasa pasang plts, jasa instalasi plts, jasa instalasi panel surya, pasang panel surya atap.
https://freenergisolar.blogspot.com
https://pasangpanelsuryafreenergi.blogspot.com/
https://ringlayer.wixsite.com/mysite
https://ringlayer.wixsite.com/freenergi
android control module:
speed control: 155,215,255
movement control : forward , backward, turn left, turn right
webcam tilt control: head move up, head move down, head move left, head move right

Decided haxtronic with only 1 hand and 1 camera. ability not just limited to 802.11 cracks, using 3 arduinos as motoric, cpu is using 2 intel core 1,85ghz, equipped with gps, ability not just limited to wpa/wep crack, this is able to calculate nearby subnet for arp poisoning, able to use metasploit for auto exploitation. since using arduino (next release probably will use picaxe) it’s easy to add 433 mhz receiver and transmitter. Handling rtl-sdr very well. why not as drone? cause this robot has some sort of artificial intelligence (SRPL), deep learning (part of machine learning), personality based on PAD and 4 main charasteristic (melancholic, sanguinist, choleric, plegma). NLP (natural language processing). I won’t share how do I made this. This will be shared as an end user product. currently developing focus on it’s artificial intelligence.
by : Antonius (@sw0rdm4n)
http://www,ringlayer.net

A. PART LISTS
– 1 sn75441one or l293dne (h-bridge ic)

– 1 Arduino Uno
– 3 HC-SR04 Ultrasonic Sensor (Front, Left and Right Sensor)
– Arduino smart Car Robot Plastic Tire Wheel with DC 3-6v Gear Motor

– Any Wheeled Chassis
You can make any chassis easily using acrylic, For example here:


For this robot, I modify my kitchen plastic supplies in order to make my own wheeled chassis:

– Mini Trolley Wheel (Front Wheel)

– Half Size Breadboard
– Jumper Wires
– 9 volt / 8,4 volt battery
– Some Bauds
B. H-BRIDGE CIRCUIT
In order to make a robot who can avoid front, left and right obstable. We need to make a robot who can turn right, left and turn back. For that reason, we need a circuit that can switch direction of voltage. For that, we can use h-bridge, For example here, we can use sn75441one or l293dne. Since a motor dc can reverse direction of spins when a voltage switch to other direction. To make a h-bridge circuit, you can follow this tutorial : http://www.instructables.com/id/Duel-Motor-Driver-with-Arduino-using-a-SN754410NE-/
The method to turn right or left is easy, this robot actually ony has 2 wheel for motoric : left wheel and right wheel. In order to turn left, right wheel must turn forward and left wheel must turn backward. Meanwhile, in order to turn right, left wheel must turn forward and right wheel must turn backward.
C. HC-SR04 ULTRASONIC SENSOR
HC-SR04 works based on this formula : Speed = Distance / Time. This sensor works by sending a ping of ultrasonic sensor, then calculate. In order to use hc-sr04 we can use NewPing library taken from here : http://code.google.com/p/arduino-new-ping/
For front sensor, connect trig pin to pin 12 on arduino, connect echo pin to pin 13 on arduino.
For left sensor, connect trig pin to pin 10 on arduino, connect echo pin to pin 11 on arduino.
For right sensor, connect trig pin to pin 6 on arduino, connect echo pin to pin 7 on arduino.
Here’s the code for arduino :
/*
Simple wheeled robot motoric with 3 sensor(s) - front, left and right
Made by : Antonius (sw0rdm4n)
http://www.ringlayer.net
*/
#include <NewPing.h>

/* front sonar */
#define TRIG_DEPAN_ATAS  12
#define ECHO_DEPAN_ATAS     13

/* left sonar */
#define TRIG_KIRI  10
#define ECHO_KIRI     11

/* right sonar */
#define TRIG_KANAN  6
#define ECHO_KANAN    7

#define MAX_DISTANCE 200
NewPing sonar(TRIG_DEPAN_ATAS, ECHO_DEPAN_ATAS, MAX_DISTANCE);
NewPing sonar_kiri(TRIG_KIRI, ECHO_KIRI, MAX_DISTANCE);
NewPing sonar_kanan(TRIG_KANAN, ECHO_KANAN, MAX_DISTANCE);

/* Modified from http://itp.nyu.edu/physcomp/Labs/DCMotorControl */

int motorkanan_arah_depan = 4;
int motorkanan_arah_belakang = 5;
int enablePin = 9;
int motorkiri_arah_depan = 2;
int motorkiri_arah_belakang = 3;
unsigned int sensor1_val = 0;
unsigned int sensorkiri_val = 0;
unsigned int sensorkanan_val= 0;
int i = 0;

void setup() {
    Serial.begin(9600);
    pinMode(motorkanan_arah_depan, OUTPUT);
    pinMode(motorkanan_arah_belakang, OUTPUT);
    pinMode(motorkiri_arah_depan, OUTPUT);
    pinMode(motorkiri_arah_belakang, OUTPUT);
    digitalWrite(enablePin, HIGH);
}
void mundur_long()
{
      digitalWrite(motorkanan_arah_depan, LOW);
      digitalWrite(motorkanan_arah_belakang, HIGH);
      digitalWrite(motorkiri_arah_depan, LOW);
      digitalWrite(motorkiri_arah_belakang, HIGH);
      delay(500);
}
void berhenti()
{
    digitalWrite(motorkanan_arah_depan, LOW);
    digitalWrite(motorkanan_arah_belakang, LOW);

    digitalWrite(motorkiri_arah_depan, LOW);
    digitalWrite(motorkiri_arah_belakang, LOW);
    delay(500);
}
void maju()
{
      unsigned int uS = sonar.ping();

      sensor1_val = uS / US_ROUNDTRIP_CM;
      Serial.println("\nsensor depan val : ");
      Serial.print(sensor1_val);
      Serial.print(" cm\n");
      if (sensor1_val < 50 && sensor1_val > 0) {
          mundur_long();
          avoid();
      }
      Serial.println("\nmaju\n");
      digitalWrite(motorkanan_arah_depan, HIGH);   //right
      digitalWrite(motorkanan_arah_belakang, LOW);
      digitalWrite(motorkiri_arah_depan, HIGH);   //left
      digitalWrite(motorkiri_arah_belakang, LOW);
      delay(50);

}
void op()
{
    maju();
}
void avoid()
{
       int loopback;
       unsigned int uSkiri = sonar_kiri.ping();
       unsigned int uSkanan = sonar_kanan.ping();

       sensorkiri_val = uSkiri / US_ROUNDTRIP_CM;
       sensorkanan_val = uSkanan / US_ROUNDTRIP_CM;
       Serial.println("if block executed");
       Serial.println("\nsensor kiri val : ");
       Serial.print(sensorkiri_val);
       Serial.print(" cm\n");
       Serial.println("\nsensor kanan val : ");
       Serial.print(sensorkanan_val);
       Serial.print(" cm\n");
       if (sensorkiri_val > 60) {
           Serial.println("belok kiri");
           berhenti();
           belok_kiri();
      }
      else if (sensorkanan_val > 60){
           Serial.println("belok kanan");
           berhenti();
           belok_kanan();
      }
      else {
           for (loopback = 0; loopback < 2; loopback++) {
               mundur_long();
           }
      }
}
void belok_kanan()
{
      digitalWrite(motorkanan_arah_depan, LOW);
      digitalWrite(motorkanan_arah_belakang, HIGH);
      digitalWrite(motorkiri_arah_depan, LOW);
      digitalWrite(motorkiri_arah_belakang, LOW);
      delay(500);
}
void belok_kiri()
{
      digitalWrite(motorkanan_arah_depan, HIGH);
      digitalWrite(motorkanan_arah_belakang, LOW);
      digitalWrite(motorkiri_arah_depan, LOW);
      digitalWrite(motorkiri_arah_belakang, HIGH);
      delay(500);
}
void loop() {
   op();
}
Once success, When the robot avoid front obstacle, it will then check left for another obstacle existence, if no obstable on left, it will then turn left. Otherwise, if there’s another obstable on left, it will then check for right side for obstable, if there’s an obstable, it will turn back, otherwise it will turn right.
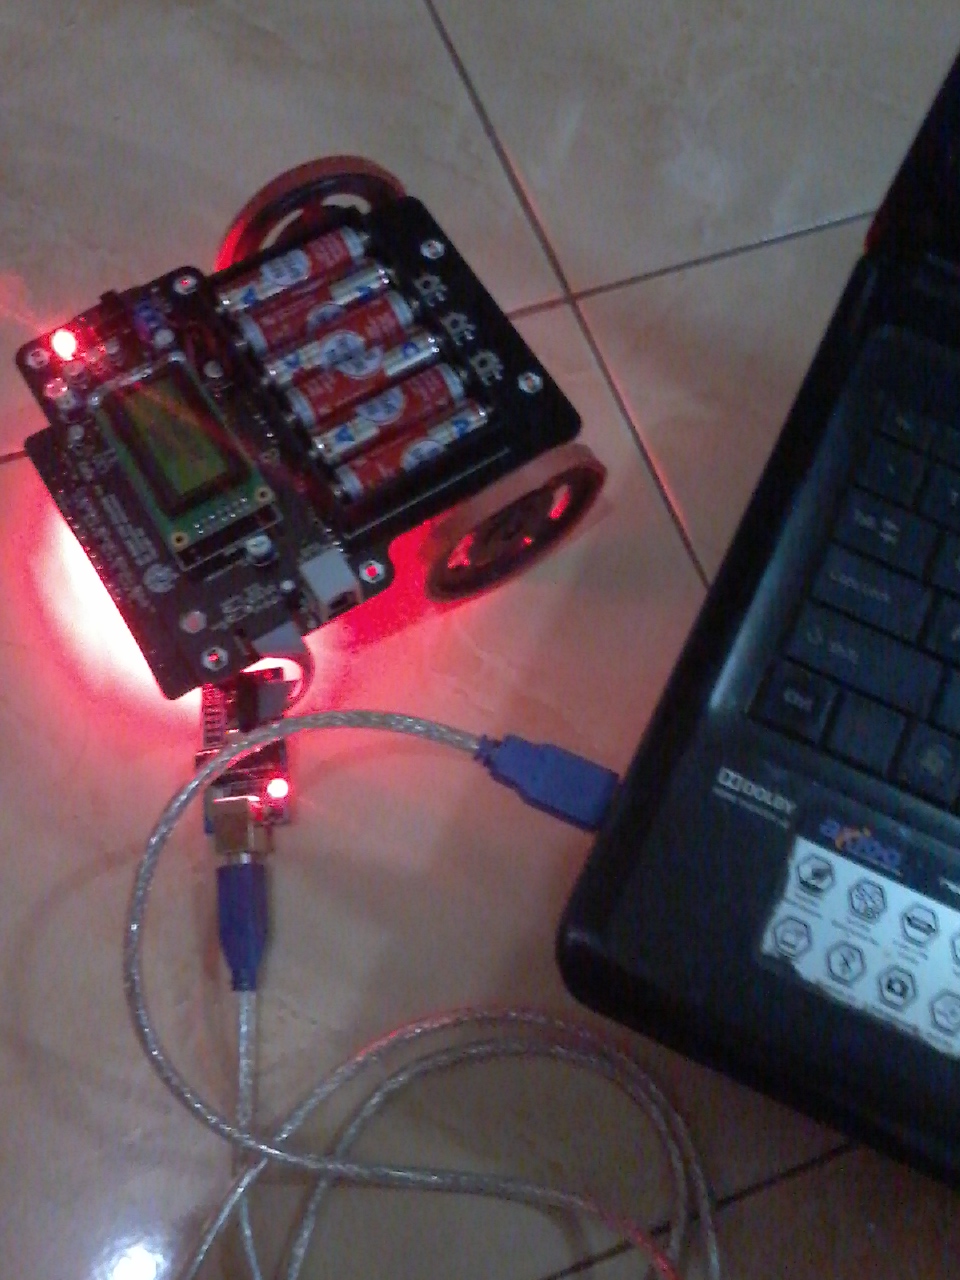
Here’s the robot on the road:
By : Antonius (sw0rdm4n)
http:///www.ringlayer.net
There are several electric circuit laws, some famous laws are kirchoff’s law and ohm’s law.
OHM LAW
Ohm law calculation is the easiest calculation on electric circuits. Ohm law applied in hydraulic mechanism, electric circuits, etc. Ohm’s law on electric circuit defines that the pressure (voltage) is the volume of electricity multiplied with the resistance :
V = I.R
V = volt , volt is the pressure of electricity.
I = ampere, ampere is volume of electricity
R = resistance
I = V/R
as an example we have some little electric circuit :

As an example pressure = 9V, resistance = 220 Ω, So current can be calculated so easily :
I = 9/220
So current is:
I = 0,04 ampere
KIRCHOFF LAW
Kirchoff law defines on the voltage and ampere. Kirchoff’s law on current (volume of electricity):
As an example here we have simple circuit:

Suppose we will calculate I4 if:
I1 = 0,4 A (positive current)
I2 = 2A (positive current)
I3= 1A (negative current)
This is the simple algebra:
i1 + i2 = i3 -i4
i1+i2 – i3 -i4 = 0
(0,4 + 2 ) – 1 – i4 = 0
i4 = 2,4 – 1 = 1,4A
Second law is kirchoff pressure law:
For an example we have a simple electric circuit:

Suppose:
v1 = 20 volt
v2 = 10 volt
R1 = 110 Ω
R2 = 220 Ω
Current (I) calculation is simple :
Since Σv = 0 :
V1 – (I * R1) – V2 – (I * R2) = 0
20 – (I * 110) – 10 – (I * 220) = 0
10 – (I * 110) – (I * 220) = 0
10 = (I * 110) + (I * 220)
10 = i * 330
I = 10/330
I = 0.030
So the current is 0,030 ampere.
By : Antonius (sw0rdm4n)
Fritzing

On more complex electronic or robotic application sometimes require more than 1 arduino as controller. Connection between 2 arduino where one act as a master and other act as a slave can be accomplished using i2c. On above schematic we connect each ground pin on each arduino. We use analog input 4 and 5 for i2c communication. Analog input 4 on master connects to analog input 4 on slave, meanwhile analog input 5 on master connects to analog input 5 on slave. For testing we connect slave to pc and we use 9 V battery for master to send command.

Arduino IDE Code
For master use this code:
/*
Simple master to send command
by : Antonius (sw0rdm4n)
www.ringlayer.net
*/
#include <Wire.h>
void setup()
{
   Wire.begin();
   Serial.begin(9600);
   Serial.println("Master Test Start");
}
void loop()
{
   Wire.beginTransmission(4);
   Serial.println("Sending command to slave");
   Wire.write('R');

   Serial.println("Command Sent !");
   Wire.endTransmission();
   delay(2000);
}
On Slave we use this code :
/*
Arduino slave test using i2c
by : Antonius (sw0rdm4n)
www.ringlayer.net
*/
#include <Wire.h>
void setup()
{
         Wire.begin(4);
         Serial.begin(9600);
         Wire.onReceive(receive);
}
void loop()
{
          delay(1000);
}
void receive(int X)
{
    char dataslave = Wire.read();

    Serial.println("\nGot command  :\n");
    Serial.println(dataslave);
}
Testing command received from master on slave (slave connected to pc) :

n.b:
Actually i2c can also be use to connect arduino and raspberry pi, since it has different voltage we can use pull up resistors to prevent any electronic component to get burnt.
Thanks :
Indonesian Backtrack Team and Members ( www.indonesianbacktrack.or.id )
Cr0 Team (www.cr0security.com)
As always for beginner in robotic (even tough not really beginner in electronic), Programming a line follower robot based on atmega microcontroller again. I use USB AVR ISP for uploading my program.